Practical guide
Drawing a Bedroom Plan to Scale: Door Swings and Furniture Footprints
Measure fixed geometry, choose one scale and draw the door’s actual travel before placing full furniture footprints. Use the original 1:20 A4 or Letter worksheets, confirm printed dimensions and keep real access and building checks separate from a paper fit.
Start with a measured room, not a preferred bed position
Draw a bedroom plan to scale by measuring the room and fixed features first, choosing one scale, and shrinking every dimension by the same factor. Add the door swing before moving furniture pieces. A bed rectangle that fits inside four walls may still prevent a door, drawer or wardrobe from opening.
This guide provides original measurement records, printable grids and fictional furniture pieces at 1:20. It answers a physical layout question: where does an object fit, and which checks remain? It does not use a bagua overlay to predict health, wealth or relationships, and no reader’s home has been inspected.
Gather a tape measure, pencil, ruler, eraser and the current dimensions of your own furniture. Choose a corner as the origin and label the walls. For the example, x runs right and y runs up from the lower-left corner of the plan. Those directions are drawing coordinates, not compass instructions.
Keep fixed geometry on one sheet and movable furniture on another. Mark doors, windows, built-in storage, radiators and projections before testing a new arrangement. In a rental, a plan helps distinguish possible movable changes from alterations requiring permission; it does not grant that permission.
Record uncertainty instead of filling a gap with a guessed measurement. An inaccessible edge or a furniture dimension taken from an old listing can change the result. Leave the affected placement unresolved until the dimension is confirmed.
Measure the edges and offsets you will actually draw
Start with the floor outline. Measure between consistent finished edges, then record recesses or fixed projections separately. If opposite sides differ, keep both values. Do not force the measurements into a rectangle simply because that shape is easier to draw.
Locate each opening from the same origin or a clearly labelled corner. “Door near the left wall” is less useful than a measured hinge offset and a marked opening. For an irregular room, divide the outline into measured segments; confirm how they join before placing a bed.
| Feature | Record | Common mistake |
|---|---|---|
| Room outline | Each wall and any recess; compare opposite sides. | Use the same reference edges; do not assume a perfect rectangle. |
| Door opening and hinge | Offset from the origin, hinge location, leaf span and actual travel. | An opening label does not establish leaf radius or clear opening width. |
| Windows and fixed features | Position, projection and operation; note heater or built-in depth. | A symbol on a floor plan cannot describe every height or operating part. |
| Furniture frame | Outer width and depth, including frame and projecting parts. | A mattress or nominal shelf size can be smaller than its whole frame. |
| Working and access areas | Drawer extension, cupboard-door travel and chair use. | Measure actual use and confirm applicable access needs; no universal allowance here. |
Mark height-dependent issues beside the plan: a window that opens inward, a high headboard or a heater’s own clearance instructions. The floor outline alone cannot settle those conflicts. Keep the relevant product directions and building conditions attached to the check.
The worksheet has space for twelve records, including uncertainties and site checks. Re-measure an unexpected dimension before acting on it. The goal is a trustworthy drawing, not a perfectly filled worksheet.
Use one scale and one unit system for the whole plan
At a scale of 1:n, one unit on the drawing represents n of the same units in the room. Divide the real dimension by n to obtain the drawing dimension. Convert mixed measurements into a common unit first; the scale ratio does not perform the unit conversion for you.
NIST’s length guidance gives 10 millimetres per centimetre, 1000 millimetres per metre and the exact standard conversion of 25.4 millimetres per inch. Thus a 3.6 metre room edge is 3600 millimetres; at 1:20 it becomes 180 millimetres, or 18 centimetres, on paper.
| Scale | Calculation | Worked example | Boundary |
|---|---|---|---|
| 1:20 metric | Real millimetres / 20 | 3600 mm becomes 180 mm. | Used by BOTH worksheet sets and their cutouts. |
| 1:50 metric | Real millimetres / 50 | 3600 mm becomes 72 mm. | Requires different furniture pieces; do not mix with 1:20. |
| 1/4 inch = 1 foot | 1 foot = 12 inches; ratio is 1:48. | 12 feet becomes 3 inches on paper. | A different scale, not another name for 1:50. |
| Unit conversion first | 1 inch = exactly 25.4 mm. | 30 inches = 762 mm; at 1:20, draw 38.1 mm. | Do not divide an inch count and label the result millimetres. |
The supplied 180 by 210 millimetre grid represents a fictional 3600 by 4200 millimetre rectangle at 1:20. Every 5 millimetre square represents 100 millimetres in that room. An actual room larger than this grid needs a larger sheet or a different scale and matching pieces.
Choose the scale before cutting furniture. Label every sheet and loose piece. A 1:50 bed on a 1:20 room looks deceptively small; changing the label cannot correct its geometry. Recalculate and redraw the piece at the scale of the room.
Draw the door’s travel, then check more than the arc
For a simple hinged door drawn opening through 90 degrees, place the compass point at the measured hinge and draw an arc whose radius is the leaf span. Mark the closed and open positions. Use the actual direction of opening; a door opening out of the bedroom needs its travel recorded on the other side of the wall.
The example uses an invented 800 millimetre leaf. At 1:20 its radius is 40 millimetres. Its hinge is 300 millimetres above the origin on the left wall; the closed leaf extends upward to y = 1100 millimetres, and the open leaf extends rightward to x = 800 millimetres. This is a quarter-circle exercise, not a measurement of a purchased door.
A real leaf may stop at a different angle, and handles or other projections can collide before the drawn edge does. Record those separately and check the door’s actual operation without forcing it against furniture. The leaf span, wall opening and usable clear opening are different quantities.
Keep sliding, folding and double doors attached to their own operating geometry. A quarter circle copied from this example does not describe them. Include the movement needed to use both a room door and a wardrobe or bathroom door where their paths interact.
Do not modify a fire door, remove a closer, wedge a door or change a hinge arrangement to make a paper layout work. Necessary alterations need the appropriate building or professional process. USFA’s home escape guidance says to draw doors and windows and keep them unblocked; it does not certify the width of a particular bedroom route.
Cut full furniture footprints and add working zones
A footprint is the outside outline an object occupies at floor-plan level. Use the full frame or cabinet dimensions. Do not shrink a bed to its mattress rectangle or assume a wardrobe’s depth includes every handle. Label the measurement source and unresolved projections.
| Object | Outer size in room | Piece at 1:20 | Additional check |
|---|---|---|---|
| Bed frame | 1600 x 2050 mm | 80 x 102.5 mm | Outer frame; not a mattress-only size. |
| Wardrobe | 1200 x 600 mm | 60 x 30 mm | Add actual door or drawer operation separately. |
| Desk | 1000 x 500 mm | 50 x 25 mm | Add the occupied / pulled-out chair area. |
| Bedside table | 500 x 500 mm | 25 x 25 mm | Record projecting handles or drawers separately. |
Draw a second outline on tracing paper for working space: drawers fully extended as actually used, wardrobe-door travel and a chair pulled out for the occupant. Keep this distinct from the cabinet or desk footprint. Neither outline supplies a universal passage-width standard.
Place fixed items first. Then try one movable piece at a time and record its position from the origin. A row of attractive paper pieces does not prove that somebody can get into bed, open storage or use a mobility aid in the room. Check those actual tasks and any applicable requirements on site.
Consider heights before calling a position workable. A headboard can interfere with a window or conceal a fixed control even when its rectangle clears the floor outline. Mark that issue beside the piece instead of trying to solve a three-dimensional conflict with a two-dimensional gap.
Use tape only to hold paper pieces on the worksheet. Avoid moving heavy furniture or testing a risky real arrangement merely to complete the exercise. A paper trial is useful because it allows you to reject a conflict before carrying out a move.
Compare two positions without treating either as an approved room
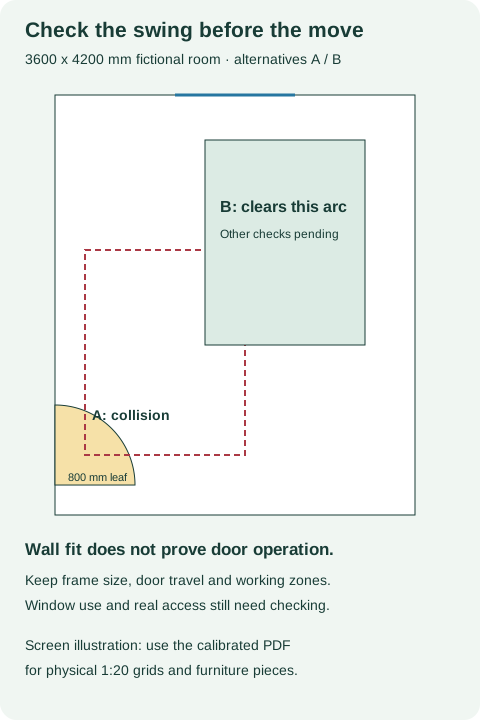
Page 4 of each PDF shows two alternative positions of the same fictional bed. The dashed outline is candidate A; the solid green outline is candidate B. They are not two beds placed in the room at once. The blue window mark records a fixed feature symbolically; its operation has not been verified.
Candidate A starts at x = 300 and y = 600 millimetres. Its nearest corner to the hinge is 300 millimetres right and 300 millimetres up from that hinge, about 424 millimetres away. That corner lies inside the 800 millimetre quarter-circle travel area. The bed therefore conflicts with this simplified door swing despite fitting within the room walls.
Candidate B starts at x = 1500 and y = 1700 millimetres, with the same 1600 by 2050 millimetre frame. Its right edge is at 3100 and its upper edge at 3750 millimetres, inside the 3600 by 4200 outline. Its footprint is also outside this door sector, whose x and y limits are 800 and 1100 millimetres.
The valid conclusion is narrow: B clears this modelled door arc. Window access, storage, bed access, handles, routes and applicable requirements still need checking. The diagram deliberately leaves those issues pending rather than labelling B the “best” or “safe” arrangement.
Print the matching set and check its physical size first
Choose A4 worksheets or US Letter worksheets to match the paper in your printer. Each file has four pages: measurement record, blank grid, furniture pieces and the two-position exercise. The sizes and calculations in the files have been checked digitally; no physical print job has been tested.
Select Actual size or 100 percent in the print dialog. A setting such as Fit, Shrink or an automatic border adjustment can alter the scale. Before cutting, measure the marked 100 millimetre line on the grid, furniture and example sheets. It must measure 100 millimetres on each printed sheet.
If a check line measures 98 millimetres, the sheet has shrunk to 98 percent. Its printed pieces no longer carry the stated physical 1:20 size. Correct the print settings and recheck all the sheets; do not assume that a correct preview or one correct page proves every page was printed at the same size.
Print with enough usable area to retain the entire grid and outlines. A missing edge is not usable merely because the check line is correct. If the printer cannot reproduce the sheet as designed, redraw on suitable paper using the formula and a ruler.
The webpage’s ordinary Print button is useful for reading notes. It does not create the calibrated cutouts. Likewise, a screenshot, resized image or browser-scaled SVG is an illustration rather than a physical scale template.
Download the plain-text measurement record to keep your own dimensions and unresolved checks together.
BEDROOM PLAN RECORD - YOUR MEASUREMENTS
Room / date / person measuring:
Origin corner and wall labels:
Units and drawing scale:
Wall A and opposite wall C:
Wall B and opposite wall D:
Door hinge from chosen corner:
Door leaf span and actual travel:
Window / heater / fixed projections:
Furniture outer width x depth:
Drawer / door / chair working area:
Uncertainty or inaccessible dimension:
Site checks / permission still needed:
Keep your record with the plan and date any revisions. After a proposed move, confirm the real operation and routes using the occupants’ needs, the building’s arrangements and relevant instructions. Follow the actual building and local fire guidance; this exercise is not a building-specific escape plan.
Six checks before treating a paper layout as workable
Try these calculation and interpretation cases, then expand each answer. They concern the stated model and printing method, not approval of a real bedroom.
Case 1
A 3600 mm wall is drawn at 1:20. How long should its paper line be?
Show answer and explanation for case 1
180 mm, or 18 cm.
Divide the real millimetres by 20. Keep the drawing unit attached to the result.
Case 2
A furniture listing gives a 1500 mm mattress, while the frame is 1600 mm wide. Which width goes on the footprint?
Show answer and explanation for case 2
The full 1600 mm frame width, plus any separately relevant projections.
A smaller sleeping-surface label cannot replace the outside outline of the object.
Case 3
A printed check line is 98 mm instead of 100 mm. Can its grid still be called a physical 1:20 template?
Show answer and explanation for case 3
No. Correct the print scaling and recheck the sheets.
The digital PDF dimensions are not proof of the actual printed dimensions.
Case 4
Candidate A fits within all four room walls but overlaps the yellow door sector. Does it pass the door check?
Show answer and explanation for case 4
No. Wall containment and door operation are separate checks.
The nearest example corner lies about 424 mm from an 800 mm hinge radius within that sector.
Case 5
Candidate B clears the modelled door sector. Have access, window use and all local requirements been approved?
Show answer and explanation for case 5
No. Only that simplified door-arc conflict has been excluded.
Additional operation, route and building checks remain pending, and no real room has been inspected.
Case 6
Can a 1:50 wardrobe piece be used on the supplied 1:20 grid, or can a 1/4 inch = 1 foot plan be called 1:50?
Show answer and explanation for case 6
No to both. Recalculate matching pieces; the imperial example is 1:48.
One quarter inch represents twelve inches, so the same-unit ratio is 0.25:12 = 1:48.
Sources and further reading
- NIST: SI Units - LengthComplete current text read. Metric unit relations and exact 25.4 mm standard inch; original scale arithmetic is shown. No actual home measurements.
- USFA: Home Fire Escape PlansComplete current page read. Map actual doors and windows and keep them unblocked; not approval of route widths or building-specific evacuation arrangements. Linked downloads and video were not read or viewed.
Check movement and reflected views
A scale plan is the starting point. These worked examples address two different checks:
Use the plan to answer a specific fit problem
Once the base drawing is measured, compare an uncertain gap, an angled footprint or two chairs in simultaneous use.